Category Archives: Uncategorized

The Perfect Day

Many of our members enjoyed a lovely time at Pepi’s beautiful home for our June gathering. Perfect weather, perfect setting, perfect strawberry shortcake, lots of great projects  and wonderful smiling women. It was the perfect day. Thank you Pepi (and Faith) for being the perfect hostesses!

TP1TP6TP2TP3TP4TP5TP7TP15TP8TP9TP11TP12

CHALLENGE! The Worm Returns

It’s time to have another CHALLENGE for Tin Pedlars members and the 2019 Cumberland Fair provides the perfect opportunity. We plan to hang the finished challenge pieces on the back wall.

The CHALLENGE! ……..

You must hook a piece with the worms you have on hand. No cutting new ones. You can trade with others, but only use current worms.

The rug can be any size that will accommodate your stash or gathered collection of worms. Another reminder that worms are not just for geometric style rugs. Picture this free pattern done with worms……

IMG_3978

Here’s some inspiration from finished challenge pieces: (check back as we’ll update as others share what they’ve done!)

Your challenge piece needs to be completed by the September 2019 meeting, so it can be hung by the Cumberland Fair committee for showing during the fair.

We have established a “community worms box” that will be available at the upcoming meetings while the challenge is active. So, if you need some, take some. If you have some to share, please do so. And yes, you can just grab a handful or two, or you can sort through for those special colors.

Members have also offered to help design rugs that will hook up well with worms. Just ask.

If you have time, you can submit multiple pieces to the challenge.

This challenge was originally designed by the Ozark Mountain Rug Hookers Guild.

Celebrate 40 years for ATHA

ATHA has invited all chapters to hook a Birthday cake to celebrate them reaching their 40th year. The celebration will be in Denver at the 2019 Biennial Rug show.

We will be celebrating together enjoying carrot cake and joining our hooking skills to complete this birthday cake (designed by a member).

60AB7474-E6C8-46A4-8B1D-F6B0CA71ABBC.jpeg

The group hooking of this 16” x 16” mat will start at the Dec. meeting. Please feel free to bring a variety of bright, colorful, sparkly materials to add to the donated fabrics for this mat.

Mug Rug Workshop 5/12

We just found out that there is an opportunity for members to take a short workshop on Saturday 5/12 with Doug in addition to his talk.

They would be working on a pattern of 4 mug rugs which I believe are 5″ across. Most wool is included but would need to be cut, probably in a 4 cut. The cost for all including instruction would be $50.00.

We will try to have cutters there.

AAMaude


My Personal Take-away from Ania Knap’s Presentation

Before I share the notes I took during Ania Knap’s presentation to the Tin Pedlars at our Nov. ’17 meeting, I want to thank her for allowing me to take (to share here) whatever photos I wanted of the many hooked items she shared during her presentation.

It was fun to hear how she started her rug hooking journey at an Adult Ed class and how the scientist she is impacts how she looks at it for the art and solutions to questions. The natural world and color drive much of her creative exploration. You will see Ania’s favorite color throughout her shared work – ORANGE!

Here’s my personal take-away from Ania’s presentation.   ~~~

There are many ways to hook circles, triangles, etc., only thing important is to have fun while you are hooking and learning along the way.

Always look for the pattern and deeper for the reflection in the pattern.

Screen Shot 2017-11-14 at 3.09.41 PM

Screen Shot 2017-11-14 at 3.10.47 PM


Symmetry is really what makes something pleasing to the eye. It is found throughout the natural world and it is how we simplify what we look at. Symmetry does not always equal mirror image. You can find symmetry within smaller components like in this pasley piece.

Look for symmetry to get to the simplest pattern when working a piece.

Screen Shot 2017-11-14 at 3.10.27 PM


Symmetry also does not have to be perfect. Sometimes the surprise is important. Think about how when you buy one kind of bulb to plant there is often 1 odd one in the batch.


screen-shot-2017-11-14-at-3-17-10-pm-e1510694578661.pngThis piece shows rotational Symmetry. It all starts with the center flower. Diagonally you notice the design compares, but it is not a mirror. The symmetry works as you rotate viewing the rug. There is also symmetry within the smaller components.

Screen Shot 2017-11-14 at 3.14.28 PM


Notice the bits of reflection from the pieces of fruit onto each other…… It’s easy to see the red in the pear by the stem point. Then the purple from the grapes in the lower edge of the pear.


Screen Shot 2017-11-14 at 3.14.45 PM

This is the wool that was used to hook the  background. The worms were cut across the stripes.


Screen Shot 2017-11-14 at 3.11.44 PM

Flora and fauna. Ania worked it from the point of Primary Colors – notice the border – red / yellow / blue. Looking more at the rug you see the flora are all cooler  – blue / yellow / green. The fauna is warmer – red / yellow /orange. You will also see purple in both flora and fauna, but the depth of color is cool or warm following along with the overall idea.


This rug is all straight line hooking of a dyed wool that progressed through colors.

Screen Shot 2017-11-14 at 3.13.32 PM

The worms were cut along the whole dyed piece to get each of the colors. Often we cut the opposite way to get wools from just one color area. The back view clearly shows the straight line hooking.

When you get to dying wool how many get concerned that there will be white spots – no dye? Well, white spots on dyed wool when hook provide the look of light hitting and reflecting in the piece. So those white spots are actually pluses.

Then how many have heard of “snow dying”? Well, what if you don’t have snow? Ice works, but you need a lot. Solution: Freeze your wool before dying. When the dye hits the frozen wool the colors separate.

And here’s my favorite!

Screen Shot 2017-11-14 at 10.26.09 AM

For me this piece shows everything – color, reflection and symmetry.

~~~ Debbie Arcaro

Combining Braiding Rug hooking and more


Our June meeting offered a presentation with Kris McDermet from Vermont. Kris shared her personal journey of learning to braid rugs and how to hook rugs. After becoming proficient in both mediums her creative mind put both techniques together so her hooked pieces have braided borders and her interior braids are surrounded by hooked areas.

Over time she has explored and expanded her skills and added even more techniques to her creations such as felting, and has been creating 3 dimensional pieces such as braided bowls. She adds textures such as silk, charmeuse and glitter or sequin fabric that is often recycled. Kris’ husband was a wonderful assistant and held the rugs so we could truly appreciate the work involved. Special thanks to Alitza Wildes who also assisted with the heavy rugs! Thank you Kris for sharing your art with us!

After the presentation we all enjoyed a delicious pot luck provided by our members. Our next meeting will be on 10 September. Enjoy your summer and stay safe!

Here are some scenes from the day:


A Maine Postcard Challenge Mat Story

Usually the posts here are about presenters and information shared or very simple sharing of information on upcoming events. Today, I’m going to write a personal experience story in the hopes it might encourage some others to follow through with their Maine Postcard challenge mat.

I’ll start off by stating that I was excited when I learned about the idea for this year’s challenge at our August board meeting. I had just completed a long fun filled preschool unit on Maine and had a ton of materials on hand to pull design ideas from. Having only bought 2 rug hooking pattens in all over the 15 years I’ve been hooking, I wasn’t thrown by the design side of the challenge. In fact I looked forward to encouraging members who hadn’t tried designing a pattern to do it with this challenge. For me the challenge would be to hook with something less than a #6 cut. I mentioned to another Tin Pedlar about doing 4 designs and making a Maine pillow after having sketching up multiple ideas and not being able to decide on one. Feeling comfortable and confident.

So, it’s 8 am New Year’s Day and I’ve resolved to get more rug hooking done in 2015 and what better place to start than with this challenge mat due in March. Should be quick and easy. Right?

  • I had my design set. DSC05999
  • I had a wonderful supply of colorful thin cuts that found their way to me and if I needed more colors I could rotary cut them.
  • I had a full day without a need to do anything else.

Wrong!

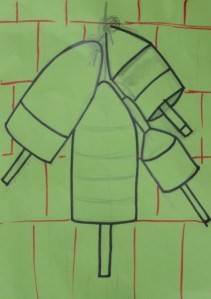
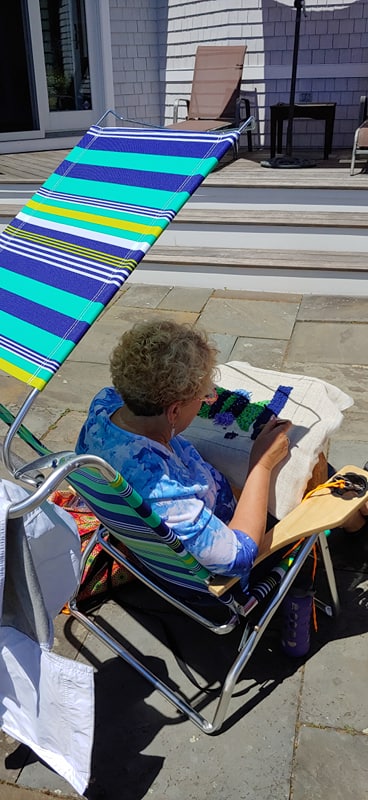
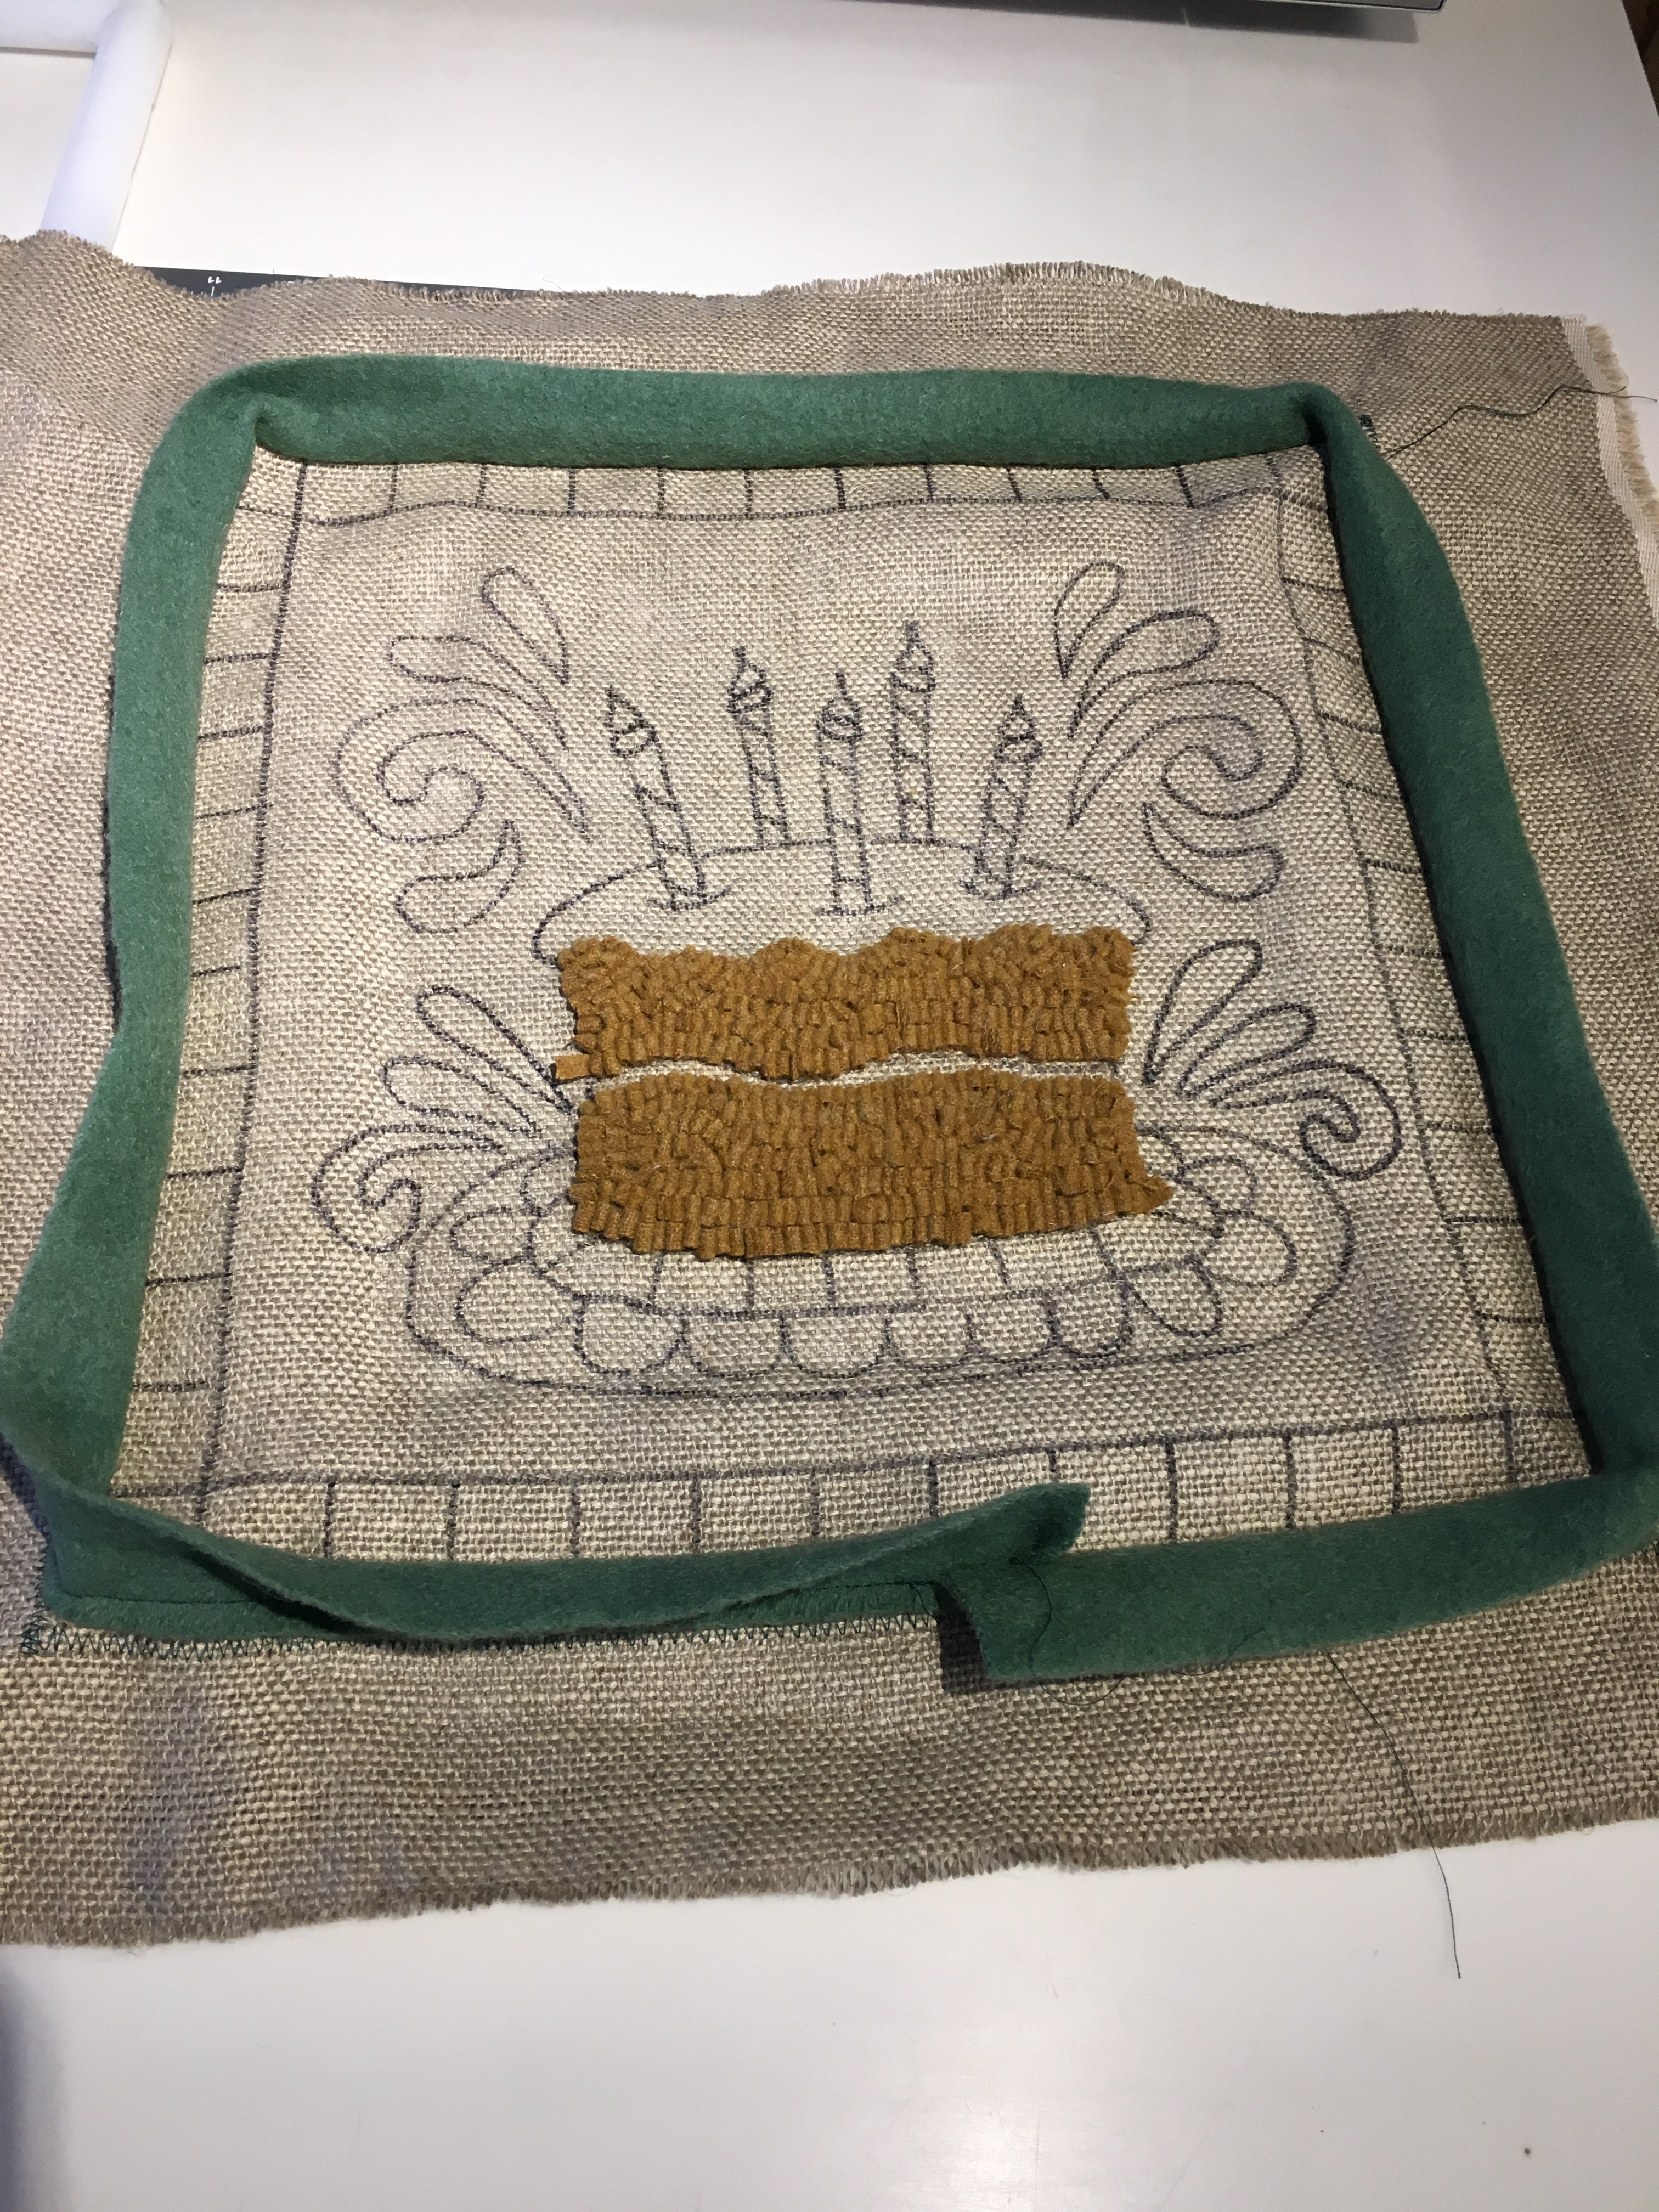
The hooking with very small cuts took a little getting used to, but figured it out enough. Not working with a design that needed too much detail the buoys worked up in good time. Then the trouble happened. As you can see from the design I figured the buoys to be hanging on a cedar shaker sided shed – grays and blacks to depict each shake. This would give a simple texture to the background. Good idea, but not one I could get to work. I tried my grays and black. Pulled the black and tried dark gray tweed. Pulled that and tried dark brown. Pulled it all and rethought the background. (Now these tries were not just a line or two, but at least half the background. On such a small mat, need to hook an area big enough to see what is happening and that means most of it.) 🙂

Tried a few sample lines of browns. Nope!

Maybe straight hooked solid background with a tweed. Nope! but closer.

Maybe diagonal lines like laying on a lobster trap. Nope!

Ok, I have now done more reverse hooking than hooking on a what 4″ x 6″ mat with a simple design. Time to laugh at myself, set the hooking aside and step away. Maybe good time for dinner as it’s about 6:30 pm. (Told you I’d done a lot of reverse hooking.) 🙂

About 9 pm I checked out my Pinterest boards for a bit of inspiration searching the Challenge board and a general search for lobster buoys. What I realized is that it had always been about the colors and patterns found in lobster buoys when I’ve seen them hanging, whether in photos, painting or in walks along the waterfronts in Maine coastal towns. What they are hanging on is backdrop. Why had I chosen this buoy design from all I had sketched? I love colors and patterns and the buoys allowed me to do that. So solution – fill the mat with more buoys.

A quick grab of the mat and sketch in some buoys. DSC05996  
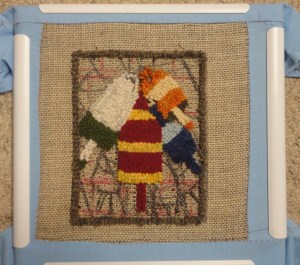
If you look close enough you can see the red shaker markings. A few black diagonal lines. But finally some extra buoys set under the already hooked ones to work as most of the background. I’d figure out how to complete the background once the buoys were all hooked.

Ok, I’m feeling better and not figuring I’ll have to start totally from scratch or hand over a mat I’m not proud to put my name with. But no more hooking tonight. I should be able to finish this off in a few hours tomorrow. Packed it all away.

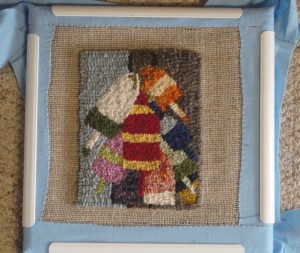
Now it’s Friday morning and time to pull some more fun colors to get some buoys hooked. This took no time at all and no reverse hooking!

Once the buoys were all completed there was very little (what I was now thinking of as colorless) background. The way the buoys were hanging I decided to split the piece and have it appear they were hanging on a shed corner with sky. This worked up quick, especially where I went with a larger cut. Probably a #5, so still below my usual width of #8.

DSC06000

My lessons and hopefully encouragement for others is:

  • feels good to step up to a challenge, because it about learning new things (Yes, I’ll hook with small cuts again, and maybe more detail next time.)
  • sometimes just have to change directions – STOP and step away!
  • thank goodness you can reverse hook 🙂
  • good to refocus on why you wanted to do this design – to clear the direction going (or not going)
  • when you get it right it just flows!
  • Creating is fun for me and being able to laugh at myself is a part of that.

DSC06002 
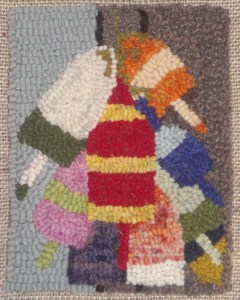
Can now say I’m proud of my mat, but still not sure if I want to do the 3 others needed for a pillow. 🙂  Think I’d rather work on a new rug design.

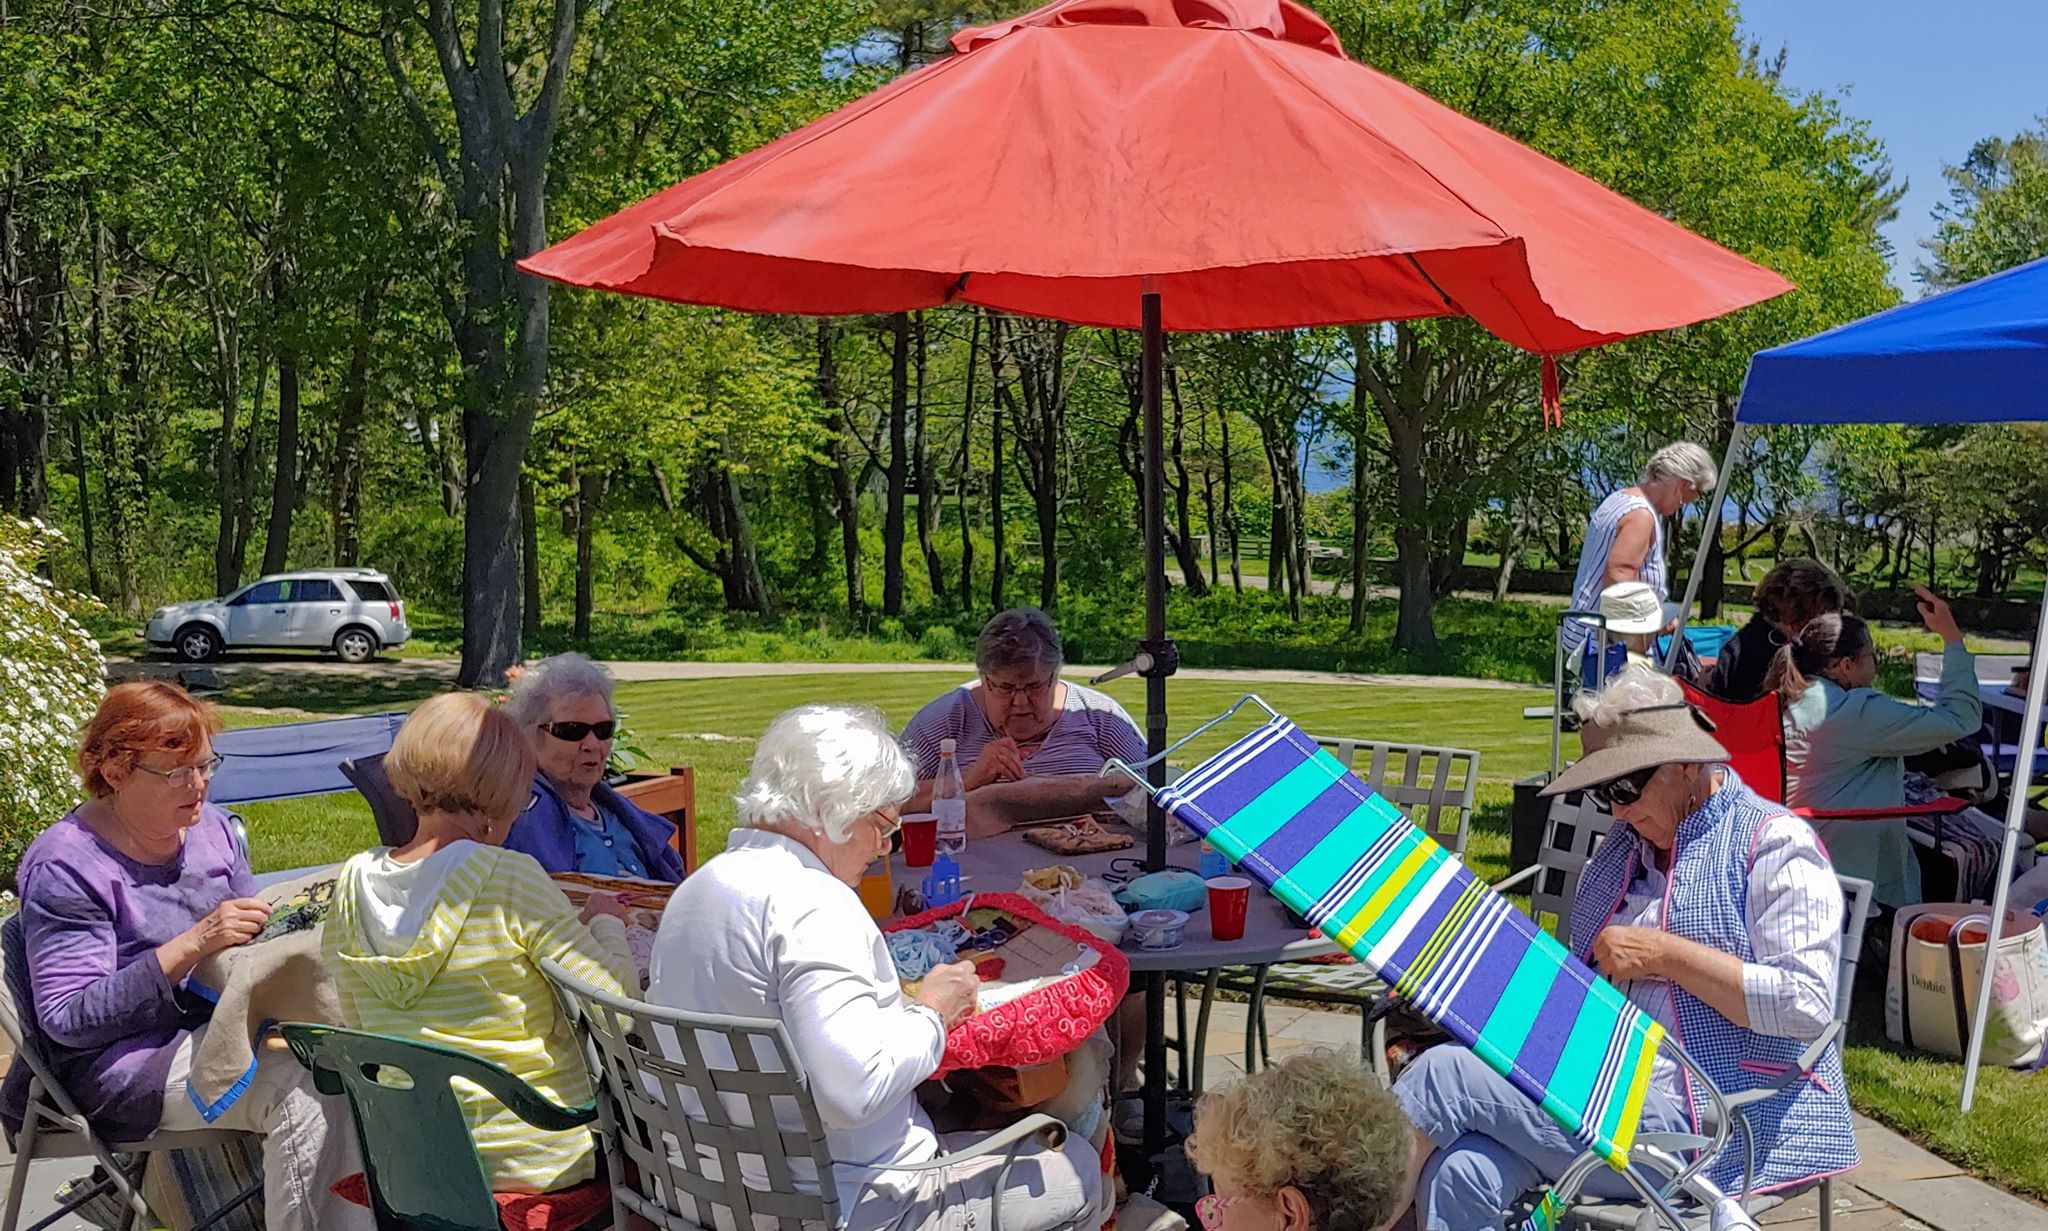
So looking forward to seeing what others have done past the designs have seen and hearing their stories.
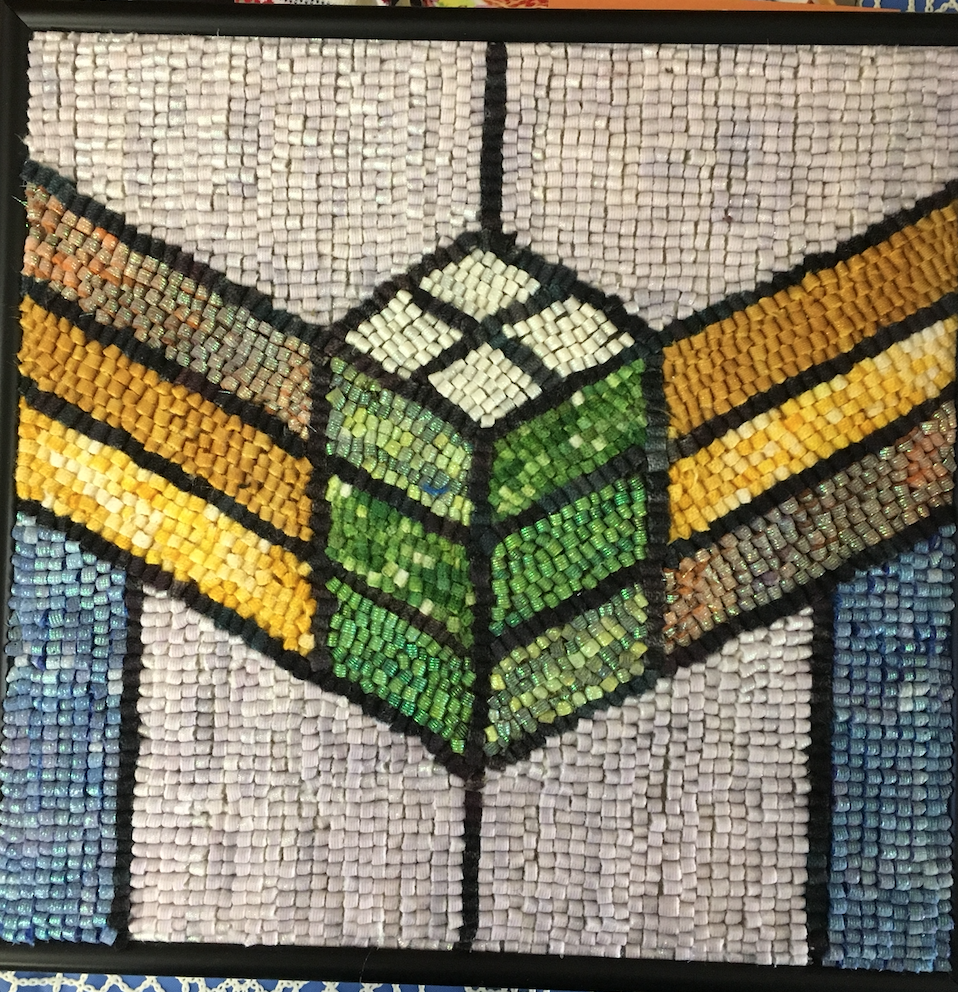
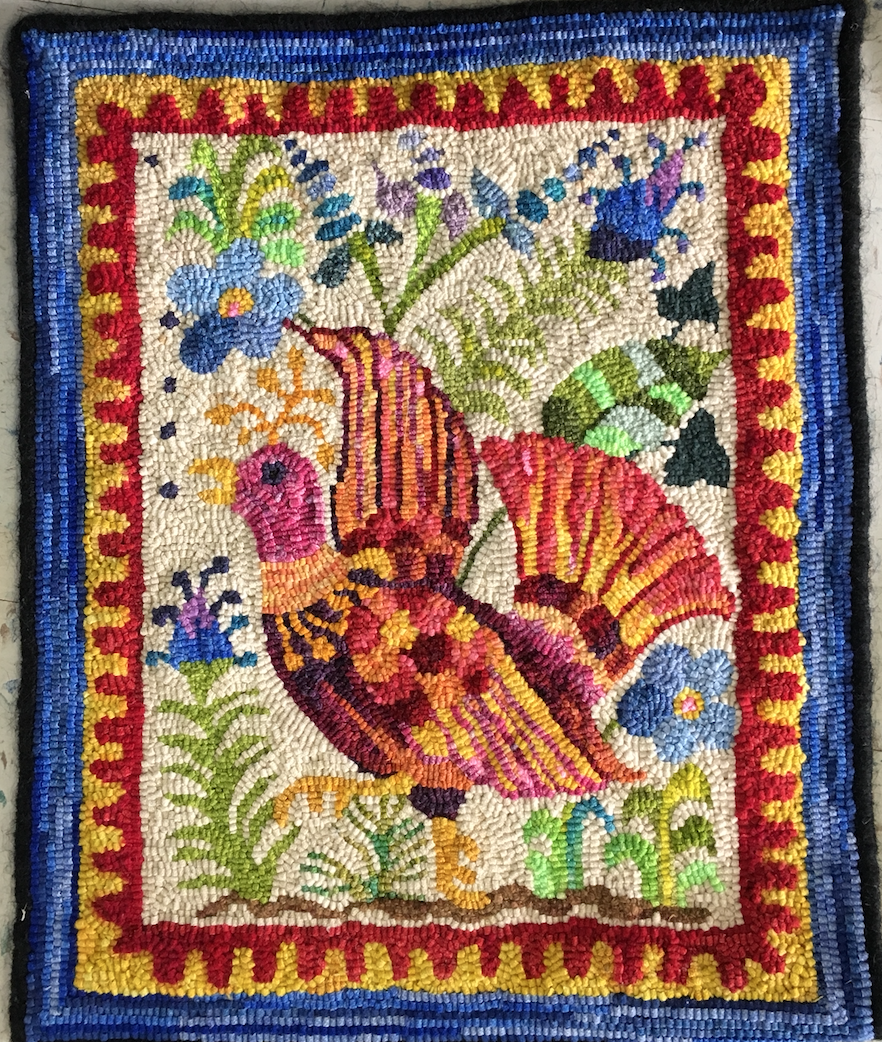
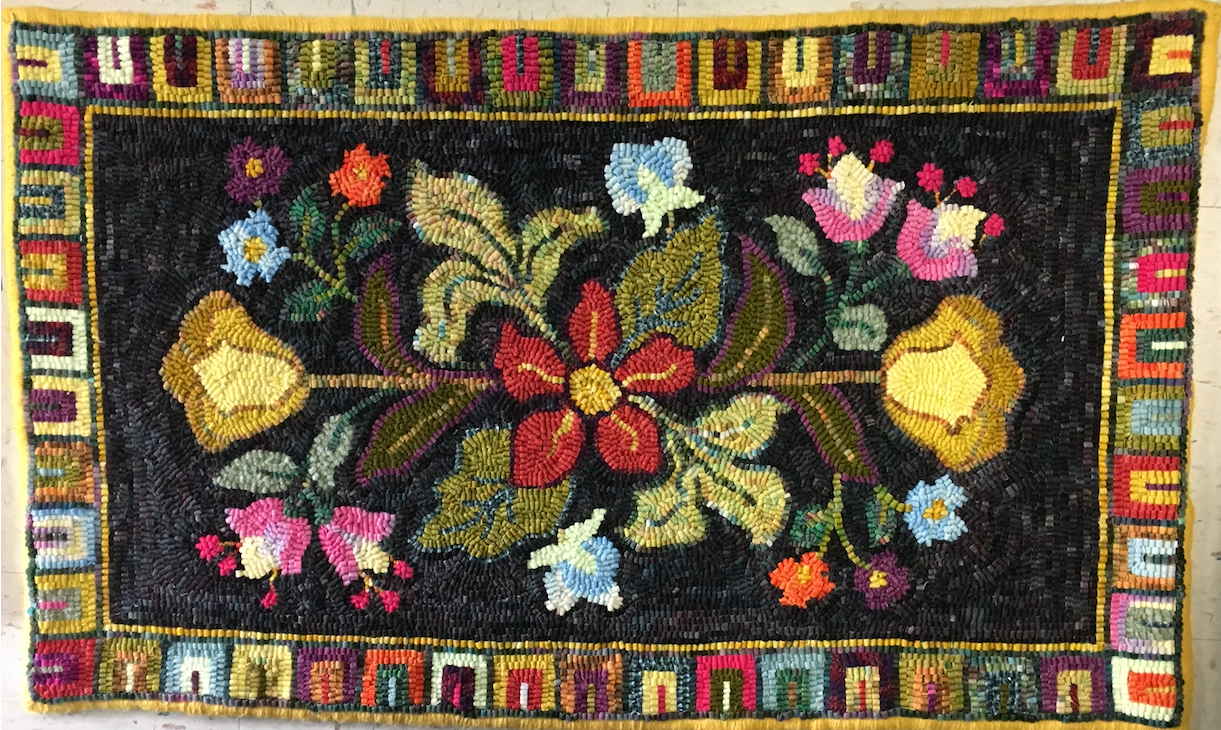
Paint Brush Dyeing with Faith Webster

Here are written notes on the process Faith presented on. We are pulling together a video of the lesson (sorry taking longer than planned).

Faith Webster presented a fun program at the May meeting, Paint Brush Dyeing.  Here are her notes for those who were unable to attend and want to try this at home, or even if you were present but want notes for future reference:
For all of you who wish to dye with paint brushes at home:
  1. Summer is a good time, do it outside.
  2. For each color, use 1/4 tsp dye in 1 cup boiling water.  Stir well.  I use Cushing dyes.  We used Crimson, Pink, Sky Blue, Buttercup Yellow and Apricot.  Peach would be good as well, but you really only need 3 colors to do a good sky – look at sky photos or the real thing and decide.  Add a dollop of vinegar to each dye container.
  3. If you have old canning jars, they work well.  They will also have covers if you want to keep unused dye for a while.  Plastic is OK as well but use those for hot beverages.  Be sure to label – dyes look a lot alike when they are mixed.
  4. When you paint brush dye at home, use a cookie sheet (as large as possible), cover it with tin foil and leave enough extra to cover your wool after you are finished.  Keep the wool as flat as possible.
  5. When you have achieved perfection, cover the whole thing with the excess tin foil, add about 1/2 to 1 cup water with 1/4 cup of vinegar and bake at 200 degrees for about 20 min.  You may not have enough water in your pan when you are finished dyeing, so check.  The idea is not to let it dry out in the oven.
Rinse and dry.  Voila – sky – or whatever.
P.S.  Mimi found that she could have used an artist’s brush which is stiffer, for vertical lines while doing her northern lights.  Make note of any other variations you may experience.

Raffle Rug 2012

The raffle rug is well under way and looking beautiful. 

So now it’s time to sell the tickets for the December drawing. The raffle ticket booklets will be available for members to pick up at the Oct. meeting.

If you are interested in purchasing raffle tickets for this rug, but will not be having contact with any Maine Tin Pedlar member please send an email to us at tinpedlar(at)yahoo(dot)com and we will arrange to get you the tickets you want.